Sunday, February 20, 2011

Short Ribs Braised in Red Wine

I can't believe I haven't posted since October. How time flies! It's not that I haven't been cooking. Believe me, everyone here at Casa Spinster are staying well fed. I've been testing some new recipes for future entries in the blog, so stay tuned.

Short ribs were on sale this week for $3.69/lb. I decided it was a perfect time to make them for the blog. When Daniel, my favorite butcher, rung them up they were $5.99/lb.  Wait.  That's not what the little sign said that was taped to the front of the meat counter. So, wonderful Daniel gave me the last $3.69 short ribs and the sign was removed. Thanks Daniel.  Someday I will do an entire page dedicated to Daniel. He shares my love of turnips. For that alone he deserves a page, but that's not the only reason. But I'll save all that for the future blog about Daniel the Butcher.


The ingredients: onion, one bottle of red wine, a can of diced tomatoes, short ribs, pancetta or lean bacon, celery, carrots, garlic, rosemary and oregano.

The recipe calls for fresh herbs. I used dried.  Given that this braises for a couple of hours, dried herbs work in this recipe.

Another modification I made was that I used the bottle of wine minus a sip or two. It's important to taste your ingredients. That's my story and I'm sticking to it.

First, put the bottle (ahem) of wine in a sauce pan and reduce to one cup. Be prepared for every wino in the neighborhood to be knocking at your door.


Put a some olive oil into your dutch oven. Season the short ribs with salt and pepper and brown them. Then remove from pan. Don't they look lovely? But wait. There's more!


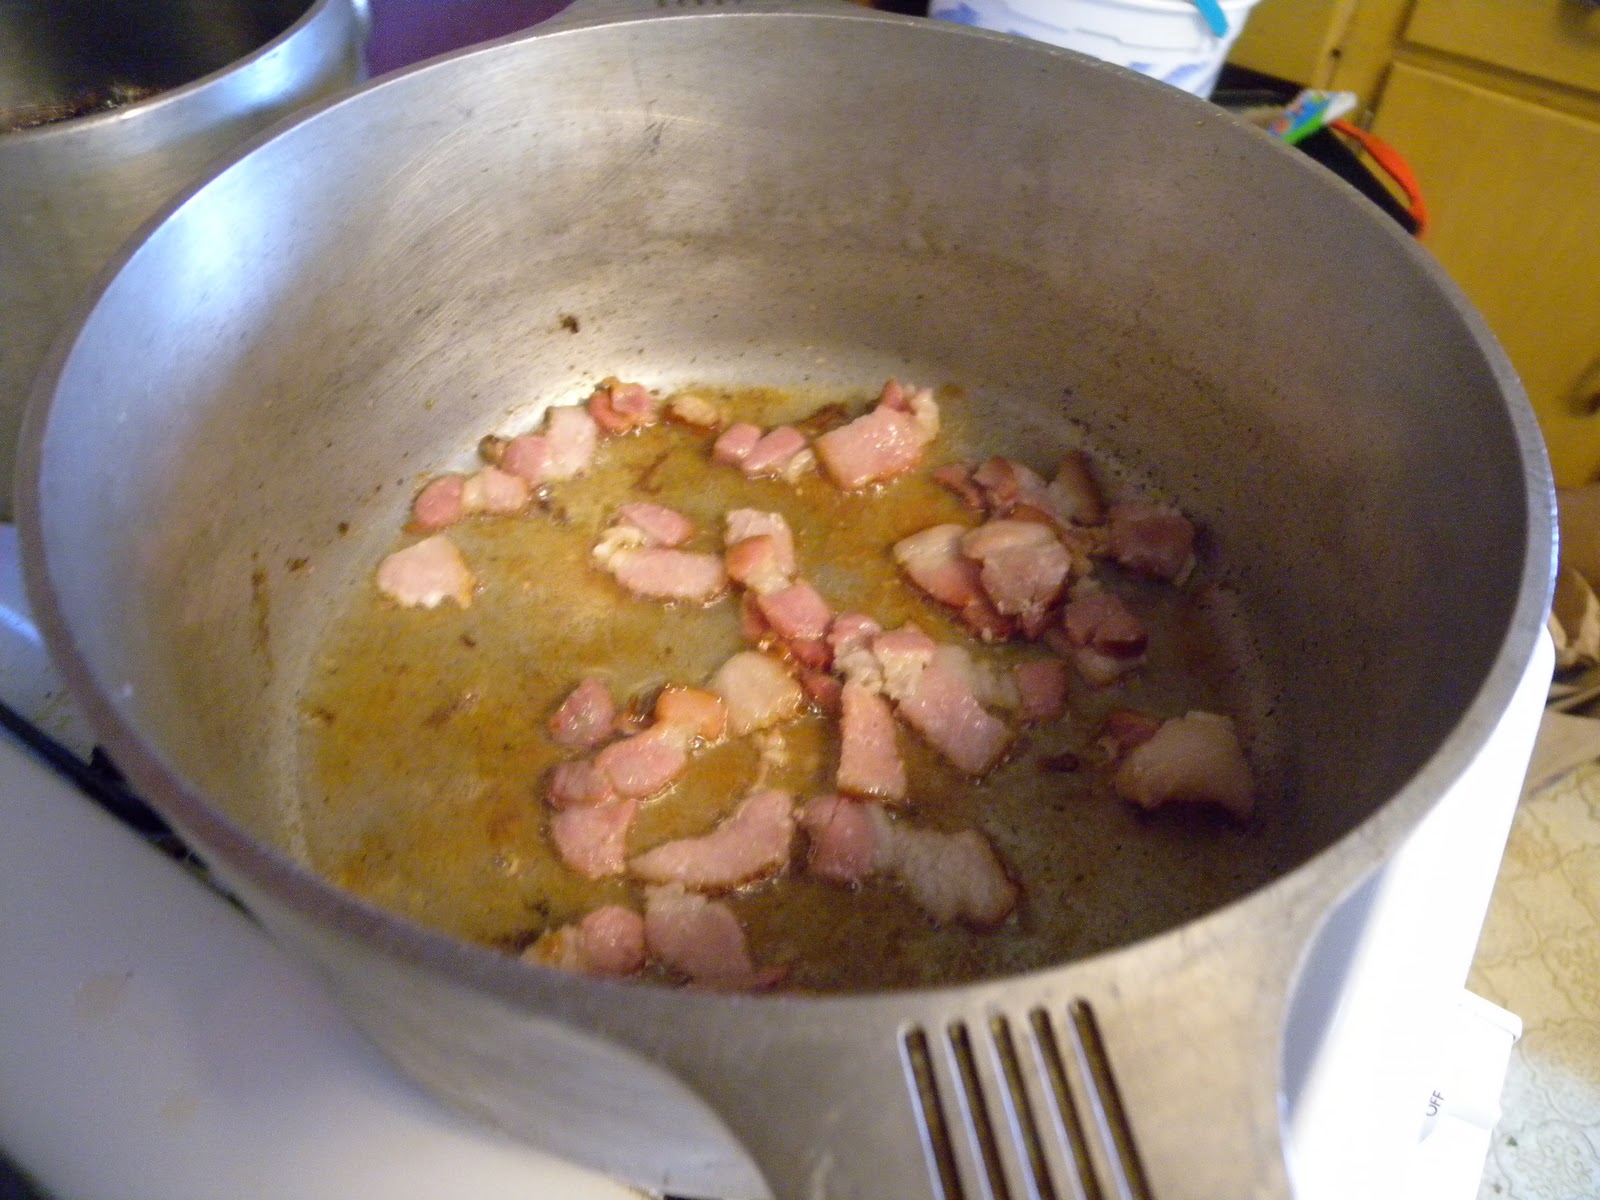
Remove all but a tablespoon of oil from the pan and add the bacon. Cook until the fat is rendered and the bacon is crispy. This was really lean bacon. Once again, thanks Daniel.


The Trinity plus one. Garlic, celery, carrots and onions.  First add the onions and cook until slightly browned. Then add the garlic and cook until just starting to brown. Don't let it go to far or else the garlic will be bitter and ruin the final product.  Finally add the celery and carrots.


You will be tempted to stop here. The smell of the bacon, onions, garlic, celery and carrots cooking is wonderful. Someday I'm going to serve this combination as a side dish. It's that good.

But add the short ribs, the reduced wine, the tomatoes and the herbs anyhow. You won't be disappointed. Bring it to a boil, put the lid on and braise it in the oven at 325 for 2 to 2 1/2 hours.


Remove the ribs and plate. Spoon some of the pan juice over the top. If the pan juice is too thin, put the pot on the stove top and boil it to reduce the sauce. The sauce is rich and flavorful.

It will look something like this. I paired it with mashed potatoes and cauliflower with some horseradish for zip. A warming winter meal. The left overs are even better the next day so don't be afraid to make this a day ahead and rewarm it to serve it.

The recipe:


Short Ribs Braised in Red Wine

Gourmet Special Edition: Italian Kitchen. 2011.

1 Bottle full bodied red wine
4-4 ½ lbs. beef short ribs
3 T. olive oil
2 oz. sliced bacon or pancetta
1 medium onion, chopped
5 large garlic cloves, finely chopped
3 medium carrots, chopped
3 celery ribs, chopped
4 thyme sprigs
2 rosemary sprigs
1 (14-15 oz.) can diced tomatoes in juice
2 cups water

Put oven rack in lower third of oven and preheat oven to 325.

Boil wine in 2-3 qt. pot until reduced to 1 c., 20-25 minutes

Pat ribs dry, rub with 2 t. salt and 1 t. pepper.

Heat oil in pot over high heat until it shimmers and quickly brown ribs on all 3 meaty sides (but not the bone side) about 1 minute/side. Pour off all but 1 T. fat and cook bacon over medium heat stirring until browned and fat is rendered. Add onion and cook until softened and lightly browned, about 6 minutes. Add garlic and cook until pale golden, about 2 minutes. Add carrots, celery and herbs and cook for 
another two minutes.

Stir in tomatoes with their juice and return ribs with any juice to pot, arranging them bone side down.
Add reduced wine and water and bring the liquid to a boil, uncovered. Cover pot and transfer to the oven. Braise until meat is tender, about 2 to 2 ½ hours.

Skim off excess fat from surface of sauce and discard herb stems. If a thicker sauce is desired, transfer ribs to a plate and boil sauce, stirring occasionally to slightly thicken.  

Saturday, October 9, 2010

Mahogany Beef Stew with Horseradish Mashed Potatoes

This is my favorite beef stew recipe. Since I first tried it, I rarely make the more traditional beef stew. When served over Horseradish Mashed Potatoes it makes for an excellent combination of sweet and spicy.  Horseradish mashed potatoes by themselves are great. This beef stew is great. But paired together, you have something that reaches an entirely different level.

Here are the ingredients, or most of them. Ingredients: beef roast, wine, onions, diced tomatoes, hoisin sauce, carrots  and herbs.


The hoisin and carrots seem to have escaped this photo. The original recipe calls for diced tomatoes with Italian herbs. Since my garden is exploding with herbs that will soon freeze, I decided to use plain tomatoes and add the herbs from my garden..

The original recipe called for a 3 1/2 lb. roast. This one is just under 2 lbs, so I adjusted the rest of the ingredients accordingly.


First, cut the meat into cubes. I used a tip roast because it was on sale. Once it is cut, brown it in a Dutch oven with 1 or 2 tablespoons of oil. At this point, you could put it in a crock pot. Or you can cook it on the stove top. I chose to cook it in the oven on a low temperature because I thought this roast, since it is a tri-tip with little fat,  needed to be braised.


Next, add diced onion and herbs. The herbs include: rosemary, basil, oregano and bay leaves. I chopped the herbs, except for the bay leaf. You don't want to eat a bay leaf by mistake. I did that once. It was a very,  very bad decision. The result was not something one should discuss in a cooking blog. Remember to take it out right before you serve.

If you are using tomatoes with Italian herbs, you don't need to add more herbs.


Then, add the  hoisin, wine and tomatoes.


Add salt and pepper and mix it all together. Cover and put in a 250 degree oven for 2-3 hours. Or in your slow cooker on low or high, depending on how long you want it to cook. Or see the original recipe below to cook it on the stove top.

Cook until beef is tender. I did this batch for about 3 hours in a low oven. Add carrots.

This is the point when my photographer got all artsy and insisted that I not put all the carrots in the picture. Just know I used twice this many.


Cook until the carrots are almost tender. At this point, move it to the top of the stove on medium to high heat and remove the lid. You want to sauce to thicken up while the carrots continue to cook. If the liquid doesn't reduce and thicken by the time the potatoes are done, add a little corn starch slurry (cornstarch dissolved in a little water). Rarely have I had to add the slurry.

Horseradish Mashed Potatoes/Parsnips

If you make this stew, you are required by law to make these potatoes. There are two key ingredients in these potatoes that make them different than your average mashed potatoes. One is the horseradish. The other is a parsnip or turnip. In these mashed potatoes I usually use half potatoes and half parsnips or turnips.

Let me take this moment to laud the under appreciated parsnips and turnips. They are one of nature's miracles. They add a depth of flavor that is incredible. Put them in anything that requires a potato or carrot. I love them in mashed potatoes, chicken broth and stews. You only need one. For such a simple vegetable it has a big personality.

My grandmother used to serve parsnips fried in butter as a side dish. I loved them. I haven't had them in y
ears, but I'm sure they will be showing up on this blog one day soon.

Here are the ingredients for my mashed potatoes: potatoes, a parsnip, butter, milk and grated horseradish.

The moody artist once again insisted that I limit the number of potatoes in this picture. I actually used four, but heaven forbid all of them be used in a photo. He said something about balance and blah, blah, blah.


Cut the potatoes into cubes. I don't peel them because I'm lazy, but I tell everyone it's because of the nutrients in the skins. I do peel the parsnip. Most parsnips you will buy are dipped in wax to help preserve them. Peeling them takes the wax off. I also peel the ones that aren't dipped in wax. I don't know if you need to. I just do it out of habit.

Put potatoes and turnip in salted cold water and bring to a boil. Simmer until they are just tender when pierced with a fork. Don't cook them any longer. They will get watery. Drain the vegetables and put them back in the hot pan.  Add butter - I eye ball it but it's usually 2 to 3 tablespoons.  Drop in a  tablespoon of horseradish and then milk. I eye ball that too. The more milk you add, the wetter the potatoes. I add little by little until I have the consistency I want. Since this stew will add moisture, I make them more on the dry side. Taste the potatoes and add horseradish as needed. I like them best when they sear the inside of my nose. You may want them a little less horseradishy depending on your preference.

Don't be afraid to make more than you need for dinner. They are wonderful in potato pancakes for breakfast the next morning.

Then plop them in a bowl and ladle the stew over the top. It will look something like this:


Mahogany Beef Stew with Red Wine and Hoisin Sauce
Bon Appétit  | February 2002


  • 4 tablespoons olive oil
  • 3 1/2 pounds boneless beef chuck roast, trimmed, cut into 2 1/2-inch pieces
  • 3 1/2 cups chopped onions
  • 2 cups Cabernet Sauvignon
  • 1 14.5-ounce can diced tomatoes with Italian herbs, undrained
  • 1/2 cup hoisin sauce*
  • 2 bay leaves


  • 1 pound slender carrots, peeled, cut diagonally into 1-inch lengths
  • 1 tablespoon cornstarch mixed with 1 tablespoon water
  • 2 tablespoons chopped fresh parsley


Heat 2 tablespoons oil in heavy large pot over high heat. Sprinkle meat with salt and pepper. Add meat to pot; sauté until brown on all sides, about 10 minutes. Push meat to sides of pot. Reduce heat to medium; add 2 tablespoons oil to pot. Add onions; sauté until golden brown, about 15 minutes. Mix meat into onions. Add 1 cup wine, tomatoes with juices, hoisin sauce, and bay leaves. Bring to boil.
Reduce heat to low, cover pot and simmer 45 minutes, stirring occasionally. Add carrots and 1 cup wine. Cover; simmer 30 minutes, stirring occasionally. Uncover, increase heat to high; boil until sauce is slightly thickened, stirring occasionally, about 15 minutes longer. Reduce heat to medium, add cornstarch mixture and simmer until sauce thickens, stirring occasionally, about 8 minutes. Discard bay leaves. Season stew with salt and pepper. (Can be made 1 day ahead. Cool slightly. Chill uncovered until cold, then cover and keep refrigerated. Bring to simmer before serving, stirring occasionally.) Transfer stew to large bowl. Sprinkle with parsley; serve.


Read More 
http://www.epicurious.com/recipes/food/views/Mahogany-Beef-Stew-with-Red-Wine-and-Hoisin-Sauce-106212#ixzz11tbKoc56

Mashed Horseradish Potatoes with Parsnips or Turnips.


4 potatoes, cubed
2 small or 1 large Parsnip, sliced and cubed.
3 T. butter
1/4- 1/2 c. milk
1 or 2 T. of horseradish

Put potatoes and parsnip in cold salted water. Bring to a boil. Simmer until vegetables are just fork tender. Drain and return to hot pan. Add butter, milk and horseradish. Mash to desired consistency. Taste. Add more milk and horseradish to your preference. This is no time to be timid!

Saturday, September 25, 2010

Hoisin Pork Roast with Green Onions

Does it seem to you like a cook a lot of pork? It seems to me like a cook a lot of pork. The main reason is that it's really cheap right now. I'm always looking for different ways to cook it.

Today I tried a new recipe: Hoisin Pork with Green Onions. The first thing that attracted me to the recipe was that it was easy. The second thing that attracted me was that the whole thing was cooked in one pot. Well one pot, a cutting board (washed twice), a knife (washed twice) a meat fork (washed twice) and a spatula (washed twice). Why is it that recipes for one pot meals never include a utensils count?

The ingredients are simple: Pork shoulder roast, scallions, hoisin sauce, pepper corns and brandy.


Put a couple of tablespoons of oil into a heavy pot and brown the pork. The recipe calls for a 5 1/2 lb. roast. I bought a 3 1/2 lb roast. I can't imagine wrestling a 5 1/2 lb. roast to brown it. This one was difficult enough.


Once the roast is browned, cover it with 3/4 cup of hoisin sauce. It will nicely cover the roast. Then sprinkle a teaspoon of pepper corns over the roast. 


Slice three bunches of scallions in 1 inch pieces.


Cover the roast with the scallions. Don't be afraid. It looks like a lot of scallions, but you will be amazed at the final result. In the mean time, it looks like a green porcupine with a cowlick problem.


Add 1/4 c. water to the bottom of the pan. Cover the pot and put it in a 300 degree oven for 3 1/2 hours. I turned the roast after two hours. The hoisin sauce had melted to the bottom of the pan, so turning it made both sides of the roast have some cooking time in the liquid.

And this is what it looked like when I removed it from the pan 3 and 1/2 hours later. If I didn't hate the word yummy, I'd say that looks yummy.


Here's another art shot. My photographer is all about the art shots.


While the roast is resting, make the sauce. Skim as much fat off the juices left in the pan as you can. Bring to a boil. Add 1/4 c. brandy. That's right. BRANDY!!! I know that most of my readers don't know that brandy comes in bottles this small. It's like it belongs in a doll house. Or it's something the Miniatures Killer on CSI would put in a crime scene diorama. It's freaky. But never fear. They still make the big bottles. I hope I didn't scare anyone.

Simmer the sauce until it thickens. The recipe suggested that you might have to add water. I didn't.


 And here is the final product. Hoisin Roast Pork with Green Onions with a side of rice.


 The taste is reminiscent of  mu shu pork. I wanted to wrap it a little pancake. Don't short the scallions They are lovely in the sauce.

If I were going to change anything, I'd grate a little ginger into the sauce.  I think that would add a nice dimension of flavor.

Oh yeah, I'd buy a bigger bottle of brandy. The cook needs her toddy!

The recipe from Bon Appétit  | October 2003


  • 1 tablespoon olive oil
  • 1 5 1/2-pound boneless pork shoulder (about 6 1/2 pounds with bone), trimmed, tied to hold shape
  • 3/4 cup hoisin sauce
  • 3 bunches green onions, cut on diagonal into 1-inch pieces (about 6 cups)
  • 1 teaspoon whole black peppercorns


  • 1/4 cup Scotch whisky
  • 3/4 cup (or more) water


  • Sliced green onions (for garnish)


Preheat oven to 300°F. Heat oil in heavy large ovenproof pot over high heat. Add pork shoulder, fat side down; brown on all sides, turning often, about 12 minutes. Remove pot from heat. Spread hoisin sauce over pork; sprinkle with green onion pieces and peppercorns. Cover pot and place in oven. Cook until pork is very tender when pierced with fork, about 2 3/4 hours, adding water to pot by 1/4 cupfuls if mixture is dry.
Remove pot from oven. Transfer pork to cutting board and tent with foil. Let pork stand 20 minutes.
Meanwhile, spoon off fat from pan juices. Stir whisky and 3/4 cup water into juices; boil 2 minutes. Add more water by tablespoonfuls if sauce is too thick, or boil to reduce sauce if too thin.
Cut pork crosswise on slight diagonal into 1-inch-thick slices. Garnish with sliced green onions. Pour pan sauce over pork and serve.


Read More 
http://www.epicurious.com/recipes/food/views/Slow-Cooked-Hoisin-Pork-Roast-with-Green-Onions-108627#ixzz10awVDghZ

Sunday, September 19, 2010

Butternut Squash, Sage, and Goat Cheese Ravioli with Hazelnut Brown-Butter Sauce

I know. I know. It sounds too good to be true.

This is not a recipe to be entered into lightly. It's going to cost you some time. But this is one of those dishes that makes grown men weep. Or at least it almost made one grown man weep. Well, not weep exactly. But he did say it was one of the best dishes I have ever made. That's close enough for me.

First let's start with the filling for the ravioli.

You will need butternut squash, 3 oz. of goat cheese, an onion, a clove of garlic, sage, salt and pepper.


I'd made roasted squash the night before for dinner, so I had about a cup left over. The recipe called for two cups, so I had to roast some more.


Yes, this is more than a cup, but as long as I had the oven on I thought I should fill the pan.  Doesn't that look perfectly caramelized and tasty? It is.

Next cook the onions, garlic, and sage in a tablespoon of butter until the onions are soft. Salt and pepper to taste.

Then mix the squash, goat cheese, onions, garlic, and sage all together until smooth.

Set it aside to cool while you make the pasta.

The original recipe called for using wonton skins to make the ravioli. Blasphemy. Why would you use wonton skins when pasta is easy to make? Especially if you have a pasta attachment for the Kitchen Aid mixer.

I love making pasta. I love it so much that I didn't take a picture. I get so wrapped up in my Kitchen Aide  mixer with the pasta attachment that I almost become hypnotized by it.


So, you are going to have to call on your imagination to picture this next part.

The ingredients: 2 c. flour; 1 teaspoon salt, 3 eggs, 2 tablespoons extra virgin olive oil.

Put flour and salt in the bowl and mix with the pasta attachment. Add the eggs one at a time. Then the olive oil. When the dough begins to form a ball, remove it from the mixer and put it on a lightly floured surface. Kneed for about 10 minutes. Or in my case, until my arms are tired. About 3 minutes. Let dough rest until you've recovered.

If you have kids, now is the time to put them to work. There's the perfect job for everyone in this recipe. As I was making it, I was imagining a big Italian family working together to make ravioli. That would be sooooo fun!

Start with the pasta roller attachment on the lowest setting. Take a piece of the dough about the size of biscotti and feed it through the machine. Fold it over and thread it through several more times. Increase the setting on the attachment one at a time until you reach the number 5 setting. I find that about perfect for ravioli.

Next lay the sheet of pasta over a ravioli press.


As you can see, I'm not exactly perfect all the time. 

As I mentioned, I use a ravioli press. If I were a more professional cook, I'm sure I could lay it out on sheets and use a ravioli cutter. But I'm an occasional ravioli maker, so a press works nicely. It keeps me from over filling.


This is the press I use. I spray the metal form with Pam before I lay the dough over it. It makes the pasta release much easier. Lay the dough down. Then take the white plastic piece and lay it over the top. It presses the dough into the holes and makes the perfect little pockets to fill. Each little pocket will hold about 2 teaspoons of filling. Don't over fill or else your ravioli will break in when you cook it and you'll lose the filling.


Roll out another sheet of pasta and lay over the top of the filled sheet.


Take a rolling pin and roll over the top to cut the ravioli. The raised parts of the form will cut the ravioli. Remove the raviolis and pinch the edges to make sure you have a good seal.


Place the ravioli in a dish and cover with plastic. Make sure they are touching as little as possible so they won't stick together. Continue to make ravioli until the dough or filling is gone. I ended up with 48 ravioli. I had about about 1/4 c. of filling left over, which was perfect for lunch the next day.

When you are ready to eat, bring a pot of water to a simmer. Drop the ravioli in one at a time and simmer until they are tender but not overly soft. About 5-6 minutes. Remove and drain.

It's important to avoid dropping them into boiling water. The water movement is more likely to break the seal on the pasta. With simmering water, you are more likely to have intact ravioli at the end of the cooking time.

While the ravioli are simmering, make the sauce.


You'll need butter, hazelnuts and sage. You should have lightly roasted the hazelnuts earlier while the squash was roasting. To roast the nuts, simply put them in a frying pan and roast over medium heat, shaking regularly. They should be ready in less than 5 minutes. Set them aside to cool. Once they are cool chop them.


To make the sauce, put the butter, hazelnuts and chopped sage in a pan and cook over medium heat until the butter begins to brown. Watch it closely. Brown butter can become burned butter in the blink of an eye. Brown butter has a rich flavor, burned butter has an acrid taste.  Remove the pan from the heat once the butter starts to brown. The nuts will continue to cook.

When the ravioli is done, drained, and plated,  drizzle brown butter sauce over the ravioli. Top with grated Parmesan cheese.


Once again our lighting sucks but the food is divine. It's a combination of sweet, tart and herby. The crunch of the hazelnuts and the richness of the brown butter adds the right layer of flavor to the filling of the ravioli. My assistant said it was one of the best meals I've ever made. He's not easily impressed.

The best part is I had enough ravioli to freeze, so I can make this again next week. And the week after that.

Try it. You will not be disappointed.


Recipe (Modified from a recipe in Gourmet, 1997)

Filling:
2 c. roasted butternut squash
1 medium onion, chopped (about 1 1/2 cups)
1 T. fresh chopped
1 tablespoon unsalted butter
1 garlic clove, minced
3 ounces aged goat cheese, grated

Sauce:
1 stick (1/2 cup) unsalted butter
1/3 cup hazelnuts,toasted lightly and skinned and chopped coarse
1 T. chopped fresh sage


Make filling:
Put squash halves, flesh sides down, an baking sheet and roast in middle of oven 30 minutes, or until flesh is very tender. When squash is cool enough to handle, scoop out flesh into a bowl and discard skin. Mash squash with a fork until smooth.

While squash is roasting, in a skillet cook onion and sage in butter with salt and pepper to taste over moderate heat, stirring, 5 minutes, or until onion is golden brown. Stir in garlic and cook, stirring, 1 minute. Cool onion mixture slightly and add to squash. Add goat cheese and stir to combine well.

Sauce:
In skillet cook butter with hazelnuts over moderate heat until butter begins to brown, about 3 minutes, and immediately remove from heat (nuts will continue to cook). Season hazelnut butter with salt and pepper and keep warm, covered.

Cook ravioli in 3 batches in gently boiling either 6 minutes, or until they rise to surface and are tender (do not let water boil vigorously once ravioli have been added). Carefully transfer ravioli as cooked with a slotted spoon to a large shallow baking pan and add enough cooking water to reach 1/2 inch up side of pan. Keep ravioli warm, covered.
Transfer ravioli with a slotted spoon ) letting excess cooking liquid drip off) to 6 plates and top with hazelnut brown-butter sauce.

Read More 
http://www.epicurious.com/recipes/food/views/Butternut-Squash-Sage-and-Goat-Cheese-Ravioli-with-Hazelnut-Brown-Butter-Sauce-14287#ixzz1020wDfGW


Pasta (Tyler Florence):
2 c. flour
1 t. salt
3 eggs
2 T. Extra Virgin Olive Oil

To make the pasta dough: In an electric mixer fitted with a dough hook*, combine the flour and salt. Add the eggs, 1 at a time, and continue to mix. Drizzle in 1 tablespoons of the olive oil and continue to incorporate all the flour until it forms a ball. Sprinkle some flour on work surface, knead and fold the dough until elastic and smooth, this should take about 10 minutes. Brush the surface with the remaining olive oil and wrap the dough in plastic wrap; let rest for about 30 minutes to allow the gluten to relax.


Tuesday, August 24, 2010

Corn Chowder

Corn chowder holds a special place in my heart. Some years ago I was recovering from major surgery and my Mom came to stay with me. She whipped up some corn chowder. I remember feeling so warm and cared for as I ate the chowder. I think it's the only time she ever made it. I asked her for the recipe earlier this year and she couldn't remember ever having made it. That's ok. I remember.

So, since Mother has no idea how to make corn chowder I had to go from memory of how it tasted and try to replicate it. This is the recipe I came up with. First a disclaimer. My photographer was not feeling  up to taking pictures today, so these are mine. I know they are not great. Just bear with me.

The ingredients: Corn, red bell pepper, onion, garlic, bacon, potatoes, chicken broth, cream and cayenne.


First dice your bacon. Ok, I just sliced it in 1/4 inch slices. Notice this bacon is ridiculously fatty. Not to worry. That's not a bad thing in this chowder.


Then, prepare your other ingredients. Red bell pepper, onion, potato and garlic.


A quick tip for cutting corn off the cob. To keep it from scattering all over the counter, put the end of the cob in a bowl. It will catch the corn and prevent a big mess. I unfortunately forgot this tip on the first cob. Luckily, my dog loves fresh sweet corn and cleaned the floor. If you don't have a sweet corn loving dog, try to remember this on the first cob. I actually made my photographer come into the kitchen to take this picture. It's that important.


Put the bacon in a large sauce pan and sauté over medium heat until crisp. Remove from pan and drain on a paper towel.


Drop the red bell pepper in the same pan and sauté for about a minute. Remove and drain on a paper towel. You can put them on the same plate as the bacon. They will go back in the pan at the same time.


Remove bacon fat leaving about 2 T. in the pan.

Add the onion, garlic and cayenne. Sauté until the cayenne blooms - or starts to be very aromatic. Add the potatoes and corn. Sauté for about 5 minutes.

Add 3 c. of chicken broth and simmer for 20 minutes or until potatoes are tender. Here's my top secret tip. Put one of the corn cobs in the pot. It will make your soup taste cornier. And that's a good thing,


Yes, I slopped all over the stove. I can't cook without making a mess on the stove. It's like things leap out of the pot.

After the potatoes are tender, remove the corn cob. It's served its purpose. Drop that bad boy in the trash like an old boyfriend. Take 2 cups of the soup and put it in the blender or food processor.  Blend  the soup until smooth and return to the pot. This step is important as it thickens the soup and makes it a creamy chowder.

Then put in the bacon, peppers and 1/2 c. of cream. Simmer until it's the thickness you like. If it gets too thick put in a little chicken broth. Salt and pepper to taste.  Put in a bowl and garnish with some fresh chives.

And here it is in all its corny bacony creamy goodness.


Serve it with a grilled cheese and tomato sandwich, a biscuit, or all by itself. It's warming and luscious. A perfect use for all that fresh corn that's available right now. If it's the middle of winter, you can use frozen corn kernals. You'll miss the richness from the cob, but you'll survive.

So here's my recipe:


Corn Chowder
6 slices of bacon, chopped
1 red pepper, diced
1 onion, diced
2 cloves garlic, diced
1/4 teaspoon cayenne pepper
6 cups fresh corn kernels (cut from 6 to 8 ears)
3-4 potatoes peeled and cut in ½ “ cubes
1 onion, diced
2 cloves garlic, diced
3 cups low-salt chicken broth
1/2 cup whipping cream
Chopped fresh chives


Sauté bacon in a large pot over medium heat until crispy. Remove from pot leaving bacon drippings. Add red pepper and sauté for three minutes. Remove.

Drain off excess bacon fat leaving 2T.  in pot.

Add onion, garlic and cayenne. Sauté for 30-45 seconds. Long enough to smell the cayenne. Add corn and potatoes. Sauté until onion is translucent. About 5 minutes.

Add broth and simmer until potatoes are tender. About 20 minutes.

Put two cups of soup in blender or food processor and blend until smooth. Return to pot. Stir in bacon, red pepper and cream. Bring to a simmer. Season with salt and pepper to taste. Add more broth if too thick.

Sunday, August 22, 2010

Pasta con Prosciutto e Piselli

We didn't photograph tonight's dinner for a number of reasons. Mainly because the kitchen is a mess. But, I want to share this recipe with the promise that we'll photograph it next time we make it.

I learned in Italy to not over sauce the pasta. It's best when lightly sauced so that the pasta and the sauce combine to make a perfect combination.  After years and years of over saucing pasta, I've learned how wonderful it is with less sauce.

The other thing I learned is why it's so important to cook pasta al dente. Al dente pasta continues to cook after it's out of the water. When you add the sauce, the pasta absorbs the flavor making it all the more delectable. Why did it take me over 50 years to learn this?

I've had this dish several times in Italy. I loved it and wanted to try to make it but thought it must require special skills to make something so wonderful. Boy was I wrong.  I had no idea how easy it is!

I first made this to use up an Easter ham. Then I found myself buying a ham just to have the leftovers to make this. Now I just buy a slice of ham. It's delicious and very quick. You can have the sauce ready in the time it takes to cook the pasta.

Ingredients:

1 lb. pasta. I prefer fettuccine. Barilla fettuccine rigate is my favorite. It has little ridges on the pasta to help hold the sauce.
3 T. butter
1 small onion, diced
1-2 cloves of garlic, minced
1/2 - 3/4 c. frozen or shelled peas
8 oz. ham cut into thin strips.
1 1/2  c. heavy cream
1/2 c. grated Parmesan
Salt and Pepper to taste.

Put water for pasta in a large sauce pan. Salt it, but don't put any oil in. It prevents the sauce from sticking to the pasta. Once the water comes to a boil, add the pasta. Cook for about 8 minutes. Or until the pasta is al dente. Drain.

In the mean time,

Melt 1 T.  butter in a frying pan or saucier.
Add onion and garlic and cook until the onion is translucent - about 4 minutes.
Add peas and one tablespoon of water. Cook for about 3 minutes.
Add ham and  cook for another 3 minutes or until ham is heated through.
Add cream and bring to a low simmer for about 5 minutes. It will reduce.
At this point I usually add some pepper. I've never put salt in, but you can if you want. I find the ham adds plenty salt.
Stir in remaining butter until it melts and add grated Parmesan.
Stir until Parmesan melts - about 15 seconds.

Pour over pasta and toss.

The if you time it right, the pasta and sauce will be done at the same time.

You can put a little Italian parsley on the top if you are into presentation. I don't bother. It's usually gone before I even think about it. Try it. You can thank me later.


Friday, July 16, 2010

A fond memory of salad

Ah, memories of meals are wonderful things. Even more wonderful is when you stumble upon a forgotten little video clip of a wonderful meal with two crazy ladies. This is video of our dinner at Casa Lasalle on our first night in Rome in July 2010. Jet lag goofiness had definitely set in!