Saturday, September 25, 2010

Hoisin Pork Roast with Green Onions

Does it seem to you like a cook a lot of pork? It seems to me like a cook a lot of pork. The main reason is that it's really cheap right now. I'm always looking for different ways to cook it.

Today I tried a new recipe: Hoisin Pork with Green Onions. The first thing that attracted me to the recipe was that it was easy. The second thing that attracted me was that the whole thing was cooked in one pot. Well one pot, a cutting board (washed twice), a knife (washed twice) a meat fork (washed twice) and a spatula (washed twice). Why is it that recipes for one pot meals never include a utensils count?

The ingredients are simple: Pork shoulder roast, scallions, hoisin sauce, pepper corns and brandy.


Put a couple of tablespoons of oil into a heavy pot and brown the pork. The recipe calls for a 5 1/2 lb. roast. I bought a 3 1/2 lb roast. I can't imagine wrestling a 5 1/2 lb. roast to brown it. This one was difficult enough.


Once the roast is browned, cover it with 3/4 cup of hoisin sauce. It will nicely cover the roast. Then sprinkle a teaspoon of pepper corns over the roast. 


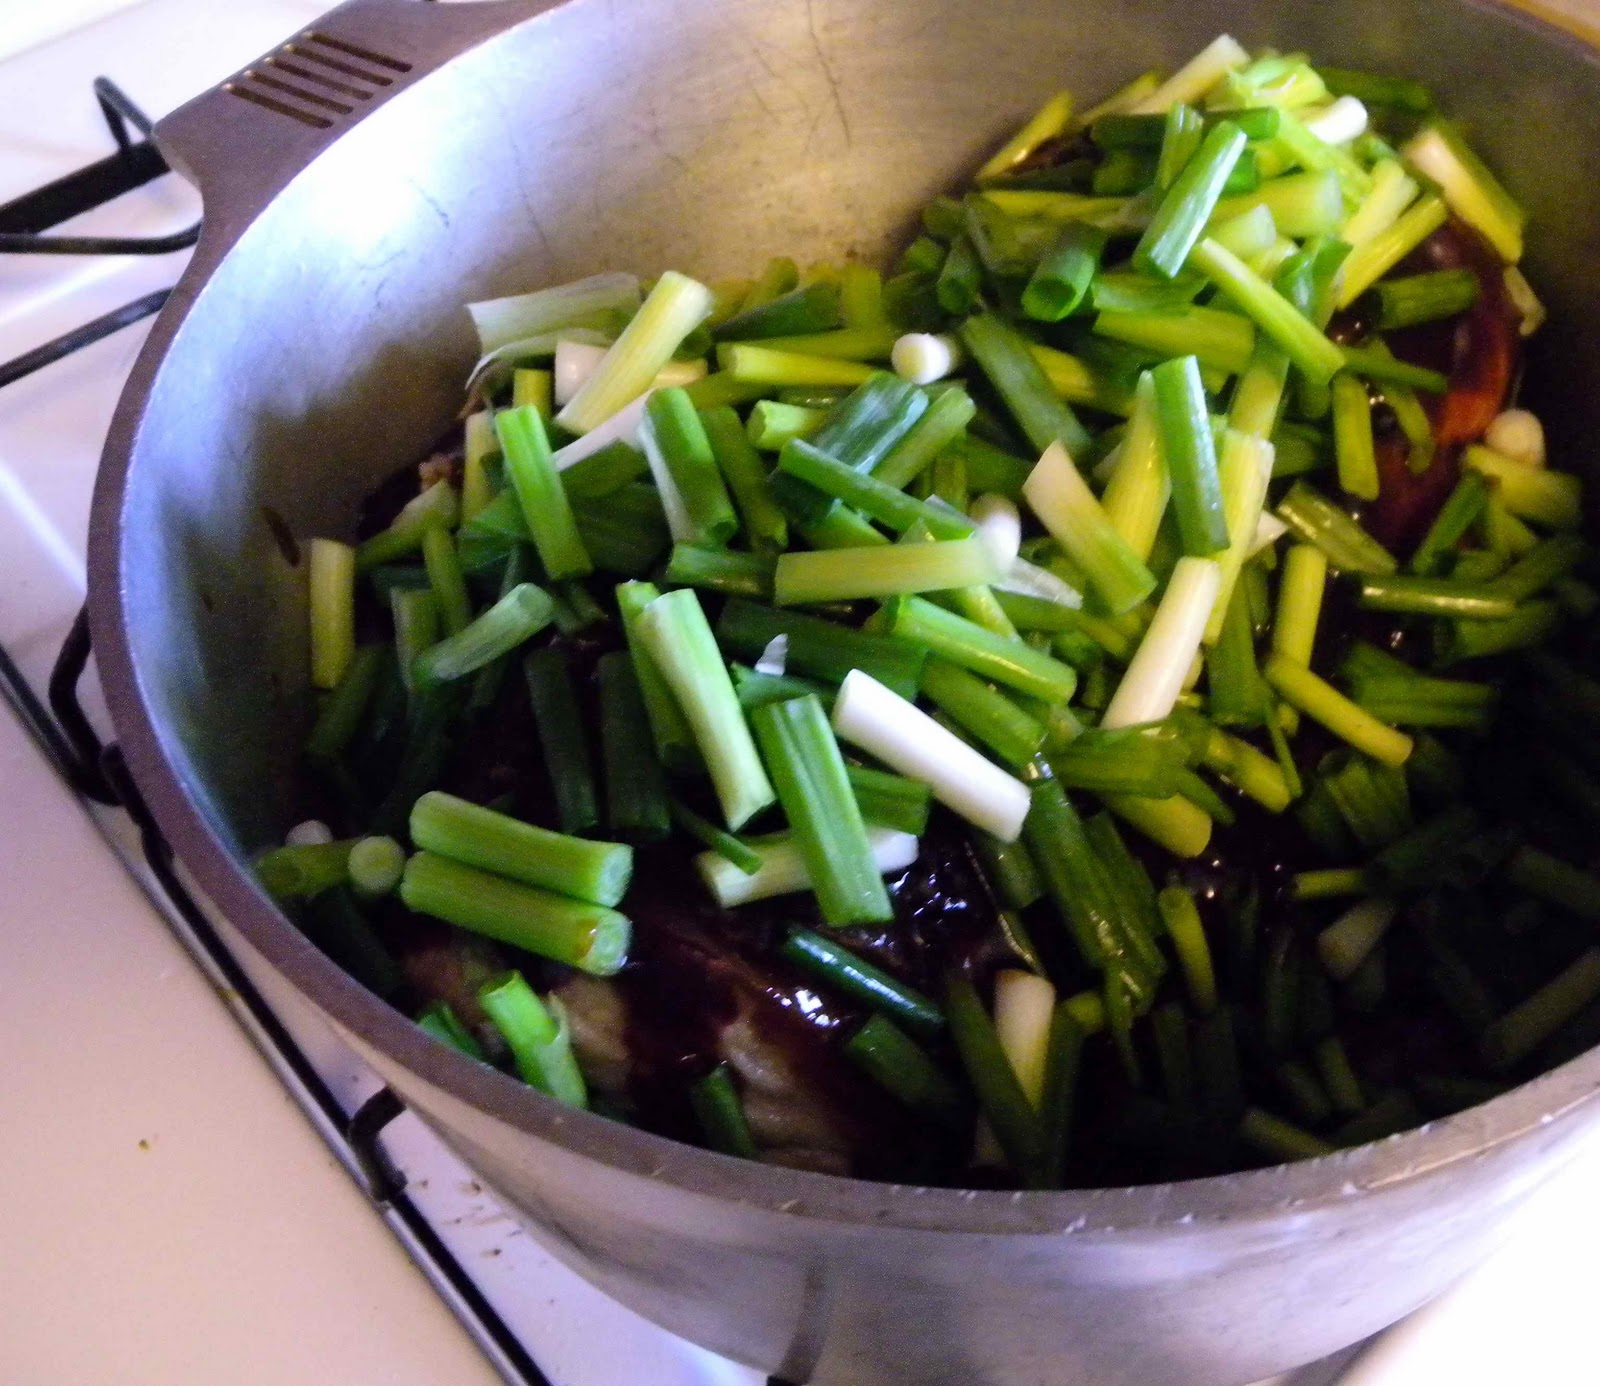
Slice three bunches of scallions in 1 inch pieces.


Cover the roast with the scallions. Don't be afraid. It looks like a lot of scallions, but you will be amazed at the final result. In the mean time, it looks like a green porcupine with a cowlick problem.


Add 1/4 c. water to the bottom of the pan. Cover the pot and put it in a 300 degree oven for 3 1/2 hours. I turned the roast after two hours. The hoisin sauce had melted to the bottom of the pan, so turning it made both sides of the roast have some cooking time in the liquid.

And this is what it looked like when I removed it from the pan 3 and 1/2 hours later. If I didn't hate the word yummy, I'd say that looks yummy.


Here's another art shot. My photographer is all about the art shots.


While the roast is resting, make the sauce. Skim as much fat off the juices left in the pan as you can. Bring to a boil. Add 1/4 c. brandy. That's right. BRANDY!!! I know that most of my readers don't know that brandy comes in bottles this small. It's like it belongs in a doll house. Or it's something the Miniatures Killer on CSI would put in a crime scene diorama. It's freaky. But never fear. They still make the big bottles. I hope I didn't scare anyone.

Simmer the sauce until it thickens. The recipe suggested that you might have to add water. I didn't.


 And here is the final product. Hoisin Roast Pork with Green Onions with a side of rice.


 The taste is reminiscent of  mu shu pork. I wanted to wrap it a little pancake. Don't short the scallions They are lovely in the sauce.

If I were going to change anything, I'd grate a little ginger into the sauce.  I think that would add a nice dimension of flavor.

Oh yeah, I'd buy a bigger bottle of brandy. The cook needs her toddy!

The recipe from Bon Appétit  | October 2003


  • 1 tablespoon olive oil
  • 1 5 1/2-pound boneless pork shoulder (about 6 1/2 pounds with bone), trimmed, tied to hold shape
  • 3/4 cup hoisin sauce
  • 3 bunches green onions, cut on diagonal into 1-inch pieces (about 6 cups)
  • 1 teaspoon whole black peppercorns


  • 1/4 cup Scotch whisky
  • 3/4 cup (or more) water


  • Sliced green onions (for garnish)


Preheat oven to 300°F. Heat oil in heavy large ovenproof pot over high heat. Add pork shoulder, fat side down; brown on all sides, turning often, about 12 minutes. Remove pot from heat. Spread hoisin sauce over pork; sprinkle with green onion pieces and peppercorns. Cover pot and place in oven. Cook until pork is very tender when pierced with fork, about 2 3/4 hours, adding water to pot by 1/4 cupfuls if mixture is dry.
Remove pot from oven. Transfer pork to cutting board and tent with foil. Let pork stand 20 minutes.
Meanwhile, spoon off fat from pan juices. Stir whisky and 3/4 cup water into juices; boil 2 minutes. Add more water by tablespoonfuls if sauce is too thick, or boil to reduce sauce if too thin.
Cut pork crosswise on slight diagonal into 1-inch-thick slices. Garnish with sliced green onions. Pour pan sauce over pork and serve.


Read More 
http://www.epicurious.com/recipes/food/views/Slow-Cooked-Hoisin-Pork-Roast-with-Green-Onions-108627#ixzz10awVDghZ

Sunday, September 19, 2010

Butternut Squash, Sage, and Goat Cheese Ravioli with Hazelnut Brown-Butter Sauce

I know. I know. It sounds too good to be true.

This is not a recipe to be entered into lightly. It's going to cost you some time. But this is one of those dishes that makes grown men weep. Or at least it almost made one grown man weep. Well, not weep exactly. But he did say it was one of the best dishes I have ever made. That's close enough for me.

First let's start with the filling for the ravioli.

You will need butternut squash, 3 oz. of goat cheese, an onion, a clove of garlic, sage, salt and pepper.


I'd made roasted squash the night before for dinner, so I had about a cup left over. The recipe called for two cups, so I had to roast some more.


Yes, this is more than a cup, but as long as I had the oven on I thought I should fill the pan.  Doesn't that look perfectly caramelized and tasty? It is.

Next cook the onions, garlic, and sage in a tablespoon of butter until the onions are soft. Salt and pepper to taste.

Then mix the squash, goat cheese, onions, garlic, and sage all together until smooth.

Set it aside to cool while you make the pasta.

The original recipe called for using wonton skins to make the ravioli. Blasphemy. Why would you use wonton skins when pasta is easy to make? Especially if you have a pasta attachment for the Kitchen Aid mixer.

I love making pasta. I love it so much that I didn't take a picture. I get so wrapped up in my Kitchen Aide  mixer with the pasta attachment that I almost become hypnotized by it.


So, you are going to have to call on your imagination to picture this next part.

The ingredients: 2 c. flour; 1 teaspoon salt, 3 eggs, 2 tablespoons extra virgin olive oil.

Put flour and salt in the bowl and mix with the pasta attachment. Add the eggs one at a time. Then the olive oil. When the dough begins to form a ball, remove it from the mixer and put it on a lightly floured surface. Kneed for about 10 minutes. Or in my case, until my arms are tired. About 3 minutes. Let dough rest until you've recovered.

If you have kids, now is the time to put them to work. There's the perfect job for everyone in this recipe. As I was making it, I was imagining a big Italian family working together to make ravioli. That would be sooooo fun!

Start with the pasta roller attachment on the lowest setting. Take a piece of the dough about the size of biscotti and feed it through the machine. Fold it over and thread it through several more times. Increase the setting on the attachment one at a time until you reach the number 5 setting. I find that about perfect for ravioli.

Next lay the sheet of pasta over a ravioli press.


As you can see, I'm not exactly perfect all the time. 

As I mentioned, I use a ravioli press. If I were a more professional cook, I'm sure I could lay it out on sheets and use a ravioli cutter. But I'm an occasional ravioli maker, so a press works nicely. It keeps me from over filling.


This is the press I use. I spray the metal form with Pam before I lay the dough over it. It makes the pasta release much easier. Lay the dough down. Then take the white plastic piece and lay it over the top. It presses the dough into the holes and makes the perfect little pockets to fill. Each little pocket will hold about 2 teaspoons of filling. Don't over fill or else your ravioli will break in when you cook it and you'll lose the filling.


Roll out another sheet of pasta and lay over the top of the filled sheet.


Take a rolling pin and roll over the top to cut the ravioli. The raised parts of the form will cut the ravioli. Remove the raviolis and pinch the edges to make sure you have a good seal.


Place the ravioli in a dish and cover with plastic. Make sure they are touching as little as possible so they won't stick together. Continue to make ravioli until the dough or filling is gone. I ended up with 48 ravioli. I had about about 1/4 c. of filling left over, which was perfect for lunch the next day.

When you are ready to eat, bring a pot of water to a simmer. Drop the ravioli in one at a time and simmer until they are tender but not overly soft. About 5-6 minutes. Remove and drain.

It's important to avoid dropping them into boiling water. The water movement is more likely to break the seal on the pasta. With simmering water, you are more likely to have intact ravioli at the end of the cooking time.

While the ravioli are simmering, make the sauce.


You'll need butter, hazelnuts and sage. You should have lightly roasted the hazelnuts earlier while the squash was roasting. To roast the nuts, simply put them in a frying pan and roast over medium heat, shaking regularly. They should be ready in less than 5 minutes. Set them aside to cool. Once they are cool chop them.


To make the sauce, put the butter, hazelnuts and chopped sage in a pan and cook over medium heat until the butter begins to brown. Watch it closely. Brown butter can become burned butter in the blink of an eye. Brown butter has a rich flavor, burned butter has an acrid taste.  Remove the pan from the heat once the butter starts to brown. The nuts will continue to cook.

When the ravioli is done, drained, and plated,  drizzle brown butter sauce over the ravioli. Top with grated Parmesan cheese.


Once again our lighting sucks but the food is divine. It's a combination of sweet, tart and herby. The crunch of the hazelnuts and the richness of the brown butter adds the right layer of flavor to the filling of the ravioli. My assistant said it was one of the best meals I've ever made. He's not easily impressed.

The best part is I had enough ravioli to freeze, so I can make this again next week. And the week after that.

Try it. You will not be disappointed.


Recipe (Modified from a recipe in Gourmet, 1997)

Filling:
2 c. roasted butternut squash
1 medium onion, chopped (about 1 1/2 cups)
1 T. fresh chopped
1 tablespoon unsalted butter
1 garlic clove, minced
3 ounces aged goat cheese, grated

Sauce:
1 stick (1/2 cup) unsalted butter
1/3 cup hazelnuts,toasted lightly and skinned and chopped coarse
1 T. chopped fresh sage


Make filling:
Put squash halves, flesh sides down, an baking sheet and roast in middle of oven 30 minutes, or until flesh is very tender. When squash is cool enough to handle, scoop out flesh into a bowl and discard skin. Mash squash with a fork until smooth.

While squash is roasting, in a skillet cook onion and sage in butter with salt and pepper to taste over moderate heat, stirring, 5 minutes, or until onion is golden brown. Stir in garlic and cook, stirring, 1 minute. Cool onion mixture slightly and add to squash. Add goat cheese and stir to combine well.

Sauce:
In skillet cook butter with hazelnuts over moderate heat until butter begins to brown, about 3 minutes, and immediately remove from heat (nuts will continue to cook). Season hazelnut butter with salt and pepper and keep warm, covered.

Cook ravioli in 3 batches in gently boiling either 6 minutes, or until they rise to surface and are tender (do not let water boil vigorously once ravioli have been added). Carefully transfer ravioli as cooked with a slotted spoon to a large shallow baking pan and add enough cooking water to reach 1/2 inch up side of pan. Keep ravioli warm, covered.
Transfer ravioli with a slotted spoon ) letting excess cooking liquid drip off) to 6 plates and top with hazelnut brown-butter sauce.

Read More 
http://www.epicurious.com/recipes/food/views/Butternut-Squash-Sage-and-Goat-Cheese-Ravioli-with-Hazelnut-Brown-Butter-Sauce-14287#ixzz1020wDfGW


Pasta (Tyler Florence):
2 c. flour
1 t. salt
3 eggs
2 T. Extra Virgin Olive Oil

To make the pasta dough: In an electric mixer fitted with a dough hook*, combine the flour and salt. Add the eggs, 1 at a time, and continue to mix. Drizzle in 1 tablespoons of the olive oil and continue to incorporate all the flour until it forms a ball. Sprinkle some flour on work surface, knead and fold the dough until elastic and smooth, this should take about 10 minutes. Brush the surface with the remaining olive oil and wrap the dough in plastic wrap; let rest for about 30 minutes to allow the gluten to relax.